39. [Flutter] Google Font 사용하기(TextStyle 통일하기 + Typography)
Google Font
Google Font에서 원하는 Font를를 적용하는 2가지 방법을 설명드리겠습니다.
1. Material Design 2 에서 Code Generator로 생성된 Code를 사용하는 방법
2. 구글 폰트에서 원하는 폰트를 가져오는 방법
+ 번외편: 위 과정이 다 귀찮고 나는 TextStyle을 통일하기만 하면된다면, Typography 를 사용하는 방법
우선 pub에 들어가서 Google Font 패키지를 프로젝트에 설치합니다.
pub 설치링크: https://pub.dev/packages/google_fonts/install
google_fonts | Flutter Package
A Flutter package to use fonts from fonts.google.com. Supports HTTP fetching, caching, and asset bundling.
pub.dev
방법.1
1) 아래 Material Design 2 링크로 들어갑니다.
Material Design 2 Code Generator링크: https://m2.material.io/design/typography/the-type-system.html#type-scale
Material Design
Build beautiful, usable products faster. Material Design is an adaptable system—backed by open-source code—that helps teams build high quality digital experiences.
m3.material.io
2) TYPE SCALE에서 원하는 폰트를 찾습니다.

3) 원하는 폰트를 찾았다면, CODE에 Flutter(.dart)를 클릭하여 Code를 생성하고, Copy합니다.

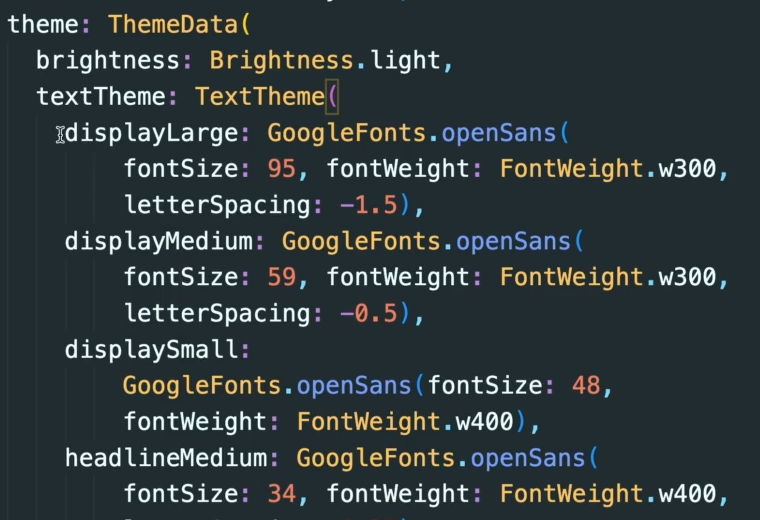
4) ThemeData의 위 소스를 textTheme: 속성에 복붙해주면 끝.
방법.2
1) 아래 링크로 접속하여 원하는 Font의 이름을 찾습니다.
구글폰트 링크: https://fonts.google.com/?subset=korean¬o.script=Kore
Browse Fonts - Google Fonts
Making the web more beautiful, fast, and open through great typography
fonts.google.com
3) 아래와 같이 사용할 style의 속성에 GooGleFonts.찾은폰트의 이름() 으로 적용합니다.

4) 지정해준 속성(headlineLarge)를 Text위젯의 style: 에 넣어주면 끝.

Google Font가 적용된 모습.

+ 번외편: 위 과정이 다 귀찮고 나는 App 내의 위젯 TextStyle을 통일하기만 하면된다면,
Typography 를 사용하시면됩니다.
따로 위젯에 style을 등록할 필요가없으며, 아래와 같이 Typography에서 원하는 Font를 찾아서 넣어주기만하면 끝.!
(자동으로 해주는데 약간 맘에 들지않는다면, 그 부분만 style:에 추가적으로 정의해주면 됨)
