
- 분류 전체보기 (240)

| 일 | 월 | 화 | 수 | 목 | 금 | 토 |
|---|---|---|---|---|---|---|
| 1 | ||||||
| 2 | 3 | 4 | 5 | 6 | 7 | 8 |
| 9 | 10 | 11 | 12 | 13 | 14 | 15 |
| 16 | 17 | 18 | 19 | 20 | 21 | 22 |
| 23 | 24 | 25 | 26 | 27 | 28 |
- 닷넷
- listview
- page
- React JS
- JavaScript
- 바인딩
- MSSQL
- Flutter
- Animation
- 자바스크립트
- 리엑트
- MS-SQL
- MVVM
- typescript
- 오류
- Firebase
- db
- Binding
- 애니메이션
- AnimationController
- 플러터
- 마우이
- spring boot
- .NET
- GitHub
- 함수
- HTML
- 파이어베이스
- Maui
- 깃허브
- Today
- Total
개발노트
6. [.NET MAUI] ViewModel 과 View(Page) 바인딩 시키기(MVVM패턴) 본문
이번시간에는 MVVM에서 V(View)와 VM(ViewModel)을 바인딩시켜보는 작업을 해보자
바인딩을 확인하기위해 Grid 버튼을 눌렀을 때 Label에 해당 Row와 Column 값을 출력시키는 기능을 만들어본다.
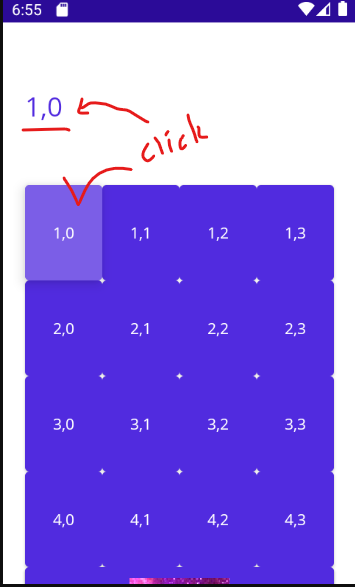
위에 보이는 Xaml 코드는 아래와 같다. (ImageSource가 들어간 버튼은 빼주세요.)
<ContentPage xmlns="http://schemas.microsoft.com/dotnet/2021/maui"
             xmlns:x="http://schemas.microsoft.com/winfx/2009/xaml"
             x:Class="AppMaui.MainPage"
             BackgroundColor="{DynamicResource SecondaryColor}">

    <ScrollView>
        <Grid Padding="20,60,20,60"  HorizontalOptions="CenterAndExpand" VerticalOptions="StartAndExpand"
              RowDefinitions="*,*,*,*,*,*"
              ColumnDefinitions="*,*,*,*">

            <Label Grid.Row="0" Grid.Column="0" Grid.ColumnSpan="4" FontSize="Title"
                   Text="" />

            <Button Grid.Row="1" Grid.Column="0" Text="1,0"/>
            <Button Grid.Row="1" Grid.Column="1" Text="1,1"/>
            <Button Grid.Row="1" Grid.Column="2" Text="1,2"/>
            <Button Grid.Row="1" Grid.Column="3" Text="1,3"/>
            <Button Grid.Row="2" Grid.Column="0" Text="2,0"/>
            <Button Grid.Row="2" Grid.Column="1" Text="2,1"/>
            <Button Grid.Row="2" Grid.Column="2" Text="2,2"/>
            <Button Grid.Row="2" Grid.Column="3" Text="2,3"/>
            <Button Grid.Row="3" Grid.Column="0" Text="3,0"/>
            <Button Grid.Row="3" Grid.Column="1" Text="3,1"/>
            <Button Grid.Row="3" Grid.Column="2" Text="3,2"/>
            <Button Grid.Row="3" Grid.Column="3" Text="3,3"/>
            <Button Grid.Row="4" Grid.Column="0" Text="4,0"/>
            <Button Grid.Row="4" Grid.Column="1" Text="4,1"/>
            <Button Grid.Row="4" Grid.Column="2" Text="4,2"/>
            <Button Grid.Row="4" Grid.Column="3" Text="4,3"/>
            <Button Grid.Row="5" Grid.Column="0" Text="5,0"/>
            <Button Grid.Row="5" Grid.Column="1" Text="5,1"/>
            <Button Grid.Row="5" Grid.Column="2" Text="5,2"/>
            <Button Grid.Row="5" Grid.Column="3" Text="5,3"/>
            <Button Grid.Row="6" Grid.Column="0" Grid.ColumnSpan="4" ImageSource="star.jpg"/>

        </Grid>
    </ScrollView>
</ContentPage>
시작!
우선 MainPage(View)의 ViewModel로 사용할 클래스를 생성하자.
1.MainPage의 ViewModel을 생성한다.
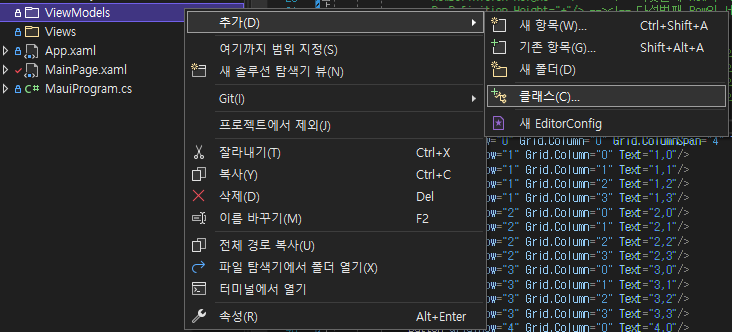
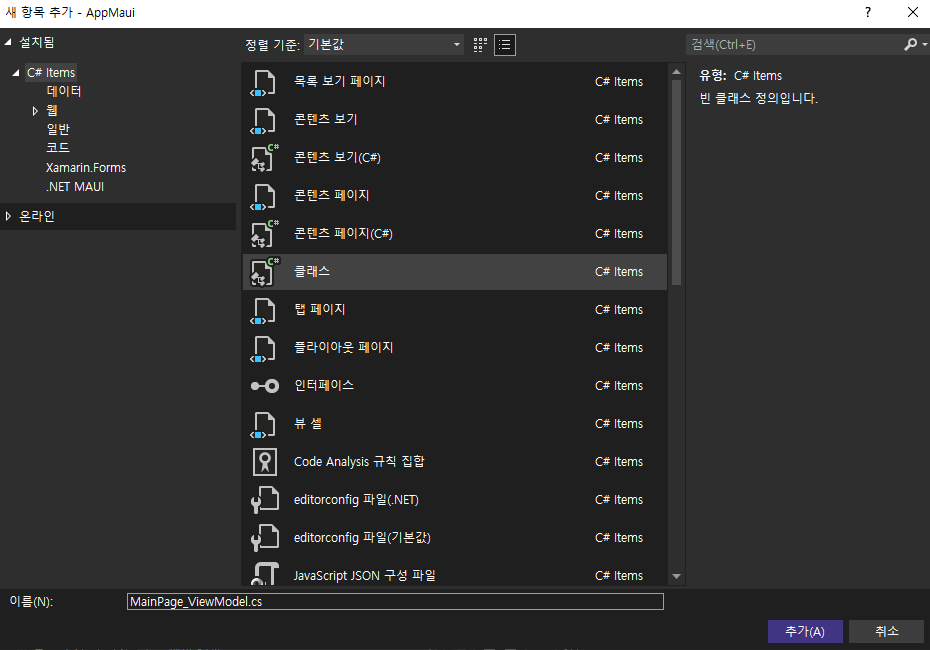
MainPage_ViewModel.cs 를 아래와 같이 작성한다.
using System;
using System.Collections.Generic;
using System.Linq;
using System.Text;
using System.Threading.Tasks;
using System.Windows.Input; //ICommand 인터페이스 사용을 위한 네임스페이스 추가
using AppMaui.Services; //Notify 상속을 위해 네임스페이스 추가
namespace AppMaui.ViewModels
{
class MainPage_ViewModel :Notify //Notify 상속
{
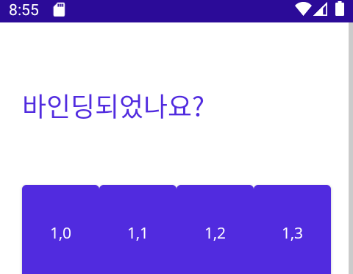
string _Row_Column = "바인딩되었나요?"; //멤버변수선언
public MainPage_ViewModel() //생성자 선언
{
}
public string Row_Column
{
get => _Row_Column;
set
{
if(_Row_Column != value)
{
_Row_Column = value;
OnPropertyChanged("Row_Column"); //Row_Column 값이 변경되었다고 알림 지속적으로 업데이트
}
}
}
}
}
1). 앞시간에 작성했던 Notify를 상속 받는다.
2). Label Text 속성에 출력할 변수명을 Row_Column로 생성한다.
3). 실시간 업데이트를 바인딩을 위해 OnPropertyChanged 메소드를 사용한다.
*뒤에 나올 ICommand 인터페이스 작성을 위해 네임스페이스에 using System.Window.Input; 을 미리 입력하자.
이제 MainPage(View)와 MainPage_ViewModel(ViewModel)을 연결해보자.
여기서 바인딩하는 방법은 2가지가 있다.
1) Xaml.cs 파일에 BindingContext 작성하는 방법
2) Xaml에 ResourceDictionary작성하는 방법)
- 첫번째 방법.
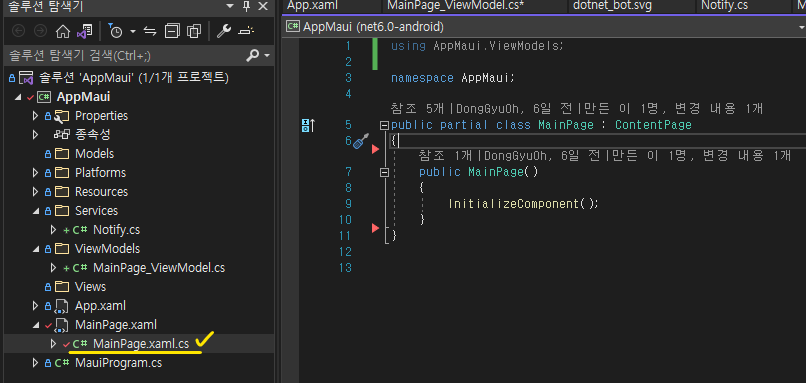
1. MainPage.xaml.cs 파일을 더블클릭하여 아래와 같이 연다.
2. BindingContext에 ViewModel을 넣는다.
using AppMaui.ViewModels;

namespace AppMaui;

public partial class MainPage : ContentPage
{
	public MainPage()
	{
		InitializeComponent();
		BindingContext = new MainPage_ViewModel();	//MainPage_ViewModel 바인딩
	}
}
3. MainPage.xaml (View)로 돌아와 Label Text값을 ViewModel에 작성되어있는 변수 "Row_Column"로 Binding 시킨다.
<Label Grid.Row="0" Grid.Column="0" Grid.ColumnSpan="4" FontSize="Title" Text="{Binding Row_Column}" />* 바인딩시키는법
바인딩시킬Property = {Binding ViewModel에 있는 변수명}
4. 바인딩이 잘되는지 빌드해본다.
- 두번째 방법.
1. MainPage.xaml (View)소스에 ViewModel이 있는 디렉토리를 xmlns (xml 네임스페이스)에 추가한다.
<ContentPage xmlns="http://schemas.microsoft.com/dotnet/2021/maui"
             xmlns:x="http://schemas.microsoft.com/winfx/2009/xaml"
             x:Class="AppMaui.MainPage"
             xmlns:vm="clr-namespace:AppMaui.ViewModels"
             BackgroundColor="{DynamicResource SecondaryColor}">
- ViewModels라는 디렉토리에 MainPage_ViewModel.cs가 있기 때문에 아래와 같은 코드를 ContentPage에 추가.
- 구분하기위해 vm이라는 별칭을 줌
xmlns:vm="clr-namespace:AppMaui.ViewModels"
2. ResourceDictionary 추가
 <ContentPage.Resources>
        <ResourceDictionary>
            <vm:MainPage_ViewModel x:Key="MainPageVM"/>
        </ResourceDictionary>
 </ContentPage.Resources>
앞에 작성했던 네임스페이스의 별칭 vm 에 있는 MainPage_ViewModel을 리소스로 사용하고 x:key 지시문을 통해 참조하는 요소를 MainPageVM이라는 값으로 고유하게 식별하도록 만들어준다.
(x:key에 대한 설명
https://docs.microsoft.com/ko-kr/dotnet/desktop/xaml-services/xkey-directive
3. Label Text에 바인딩하기
<Label Grid.Row="0" Grid.Column="0" Grid.ColumnSpan="4" FontSize="Title"
                   Text="{Binding Source={StaticResource MainPageVM}, Path = Row_Column }" />
Text="{Binding Source={StaticResource 고유key값}, Path = ViewModel에 있는 변수명}"
4. 바인딩 되는지 빌드해본다.
2가지 방법 모두 잘 바인딩 된다. 차이점 정도는 알아봐야겠다.
다음시간에는 버튼을 클릭했을 때 Grid Row, Column값이 나오도록 해주는 ICommand 인터페이스를 사용하는 법을
설명하겠습니다.
'앱 개발 > .NET MAUI' 카테고리의 다른 글
| 8. [.NET MAUI] INavigation 으로 Page(View) 전환하기 (0) | 2022.03.14 |
|---|---|
| 7. [.NET MAUI] ICommand 사용하기 (0) | 2022.03.10 |
| 5. [.NET MAUI] Xaml에서 Grid 사용법 (0) | 2022.03.07 |
| 4. [.NET MAUI] INotifyPropertyChanged 인터페이스 상속하기(MVVM 패턴) (0) | 2022.03.07 |
| 2. [.NET MAUI] Xaml 소스 디자인하기 (0) | 2022.03.02 |


